Important Note:
Before beginning the installation process, please make sure you are using the latest version of WordPress and the Theme.
Getting Started
Let’s get started! First, make sure that you have all the necessary things required to install FT Directory Listing Free
Theme Requirements
Make sure you have the latest version of WordPress installed, by checking the updates tab from your current WordPress dashboard.
If you haven’t downloaded WordPress already, you can download it from the WordPress repository via WordPress Official Site.
After you have the latest version of WordPress, download the theme ZIP file, and save it somewhere handy on your computer, as you will be using the included files for the rest of the installation process.
Theme Installation
Step 1: Upload and Activation
There are two methods to install FT Directory Listing Free theme. You may either upload the zipped theme file using the WordPress theme installer (Recommended), or you can upload the unzipped theme folder via FTP (Advanced).
Method 1 ( Recommended) : Install Using the WordPress Theme Installer
Log into your WordPress site and opens the Administration Panel.
- Go to Appearance > Themes in the WordPress Dashboard
- Click on the Add New button.
- Click on the Upload Theme link.
- Click on Choose File, select the ft-directory-listing.zip file from your computer and click upload.
- Click Install Now
Method 2: Install Using File Transfer Protocol (FTP)
- Unzip “ft-directory-listing.zip” file on your computer.
- Login using FTP client to access your host web server.
- Locate the wp-content folder in your WordPress install files.
- Upload the un-zipped ft-directory-listing folder into the: wp-content/themes folder.
For More Information about installing theme using FTP. Check how to add a new theme.
Activate the theme
- Log in to the WordPress Administration Panel.
- Go to Appearance > Themes in the WordPress menu
- Hover over the theme thumbnail and click the Activate button.
Import Demo Content
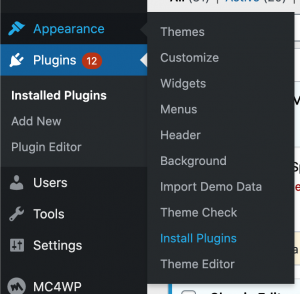
Go to Appearance/ Install Plugin and install and activate the recommended plugins from there
After you have installed and activated these plugins, Now go to Dashboard/ Appearance/ Import Demo Data. From there you can import the demo content for FT Directory Listing
Theme Options (Changing Demo Content)
After you have set up the demo, you can change the Homepage content from here ( Appearance/ Customizer/ Theme Options )you will be able to use these options
Theme Options are
- Banner Section
- Listing Section Options
- Call to Action Options
- Blog Section
- Prefooter Section